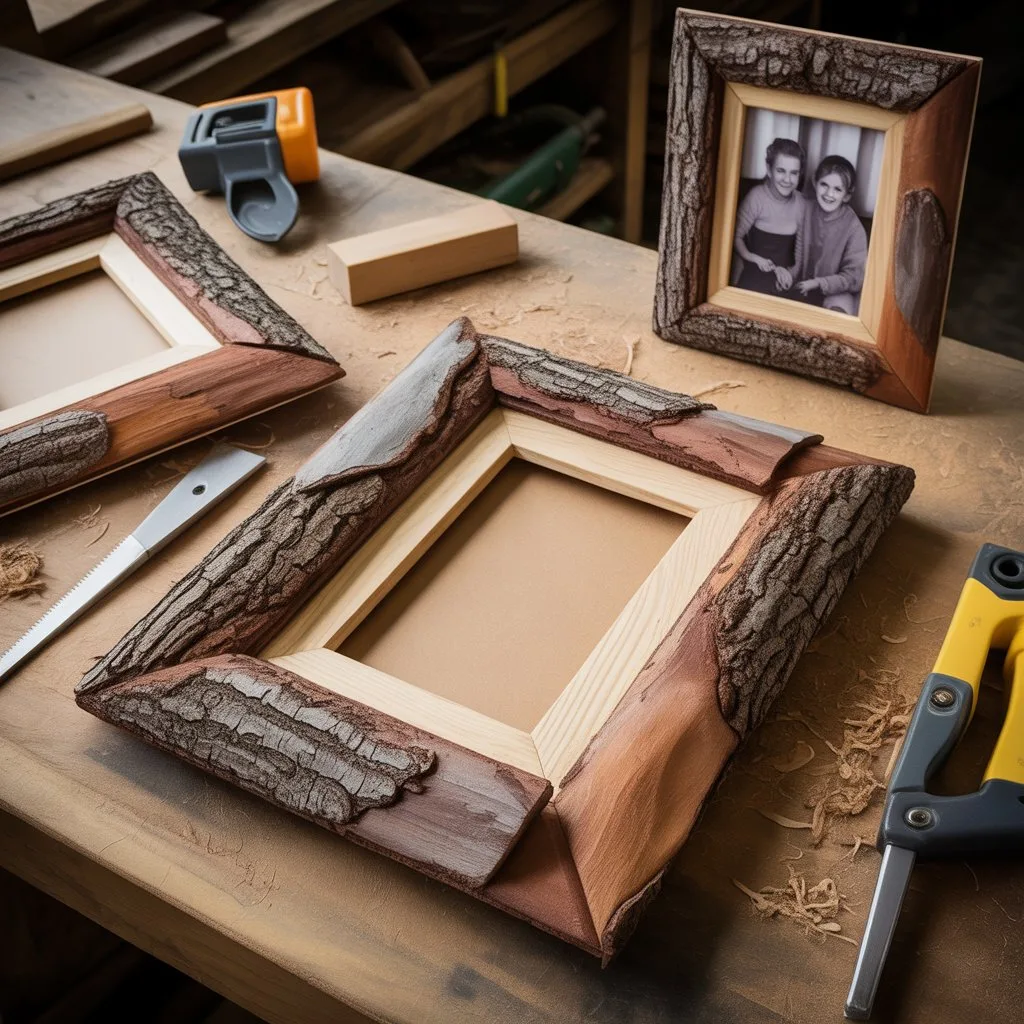
Creating a rustic photo frame using tree bark is an excellent way to blend creativity with sustainability. This hands-on project brings the beauty of nature indoors while allowing you to craft a one-of-a-kind piece that tells a story. Using tree bark, twigs, and recycled materials not only reduces waste but also connects you to the natural textures and colors that mass-produced décor often lacks. Whether you want to highlight a favorite photograph, a handmade drawing, or a pressed flower, a bark frame adds a warm, organic touch to your home.
Choosing the Right Tree Bark
Selecting the right bark is key to making your rustic frame durable and beautiful. Opt for bark that has naturally fallen off trees or can be collected from already-cut branches. Avoid stripping bark directly from living trees, as this can damage them. Ideal options include oak, birch, pine, or eucalyptus, which have distinct textures and colors.
The bark should be dry but not brittle. If it feels damp or soft, let it air dry for several days before working with it. You can also lightly sand rough edges to remove splinters without losing the natural look. Collect small, flat pieces that can be easily glued to your frame base — consistency in size and texture will help create a balanced design.
Preparing the Frame Base
You can use an old picture frame, a cardboard cutout, or even reclaimed wood as the base. If you’re repurposing an old frame, clean it thoroughly and remove any chipped paint or varnish. For a more eco-friendly option, cut sturdy cardboard into your desired shape. Rectangular and square frames are classics, but experimenting with circles or ovals can make your piece more unique.
Mark the space for the photo in the center and ensure you leave a border wide enough to hold the bark pieces securely. If you want to add a glass front, ensure it fits snugly before starting your design. Otherwise, you can leave it open for a more natural, textural look.
Assembling the Rustic Design
Arrange the bark pieces around the frame before gluing them down. This helps you visualize how the final result will look and allows you to mix tones and textures harmoniously. For a more rugged appearance, layer the bark in uneven patterns. If you prefer a refined finish, trim the edges and align the pieces neatly.
Use eco-friendly wood glue or a hot glue gun to attach the bark to the frame. Apply glue sparingly so it doesn’t seep through visible gaps. Press each piece firmly and allow it to dry completely before moving the frame. You can also incorporate small twigs, dried leaves, or moss between bark layers to add dimension and character.
To enhance durability, you may apply a thin coat of clear, matte varnish made from non-toxic ingredients. This helps preserve the bark’s color and protects it from moisture, especially if the frame will be displayed in a humid environment.
Adding Decorative Touches
A rustic photo frame doesn’t need to be plain — small accents can make it stand out while maintaining its natural charm. Consider adding:
- Twine or jute rope around the edges for a farmhouse-style finish.
- Pressed flowers under a thin layer of resin or varnish for a delicate, botanical touch.
- Pebbles, acorns, or pinecones glued to one corner to create a forest-inspired theme.
- Wood-burned initials or dates if you want to personalize the frame for a gift or special memory.
Be mindful not to overdecorate — simplicity often enhances the natural appeal. Each element should complement, not compete with, the bark’s texture and color.
Using and Displaying Your Frame
Once your rustic photo frame is complete, the possibilities for display are endless. It can hang on a wall, sit on a desk, or even serve as part of a gallery wall featuring nature-inspired artwork. For a cohesive theme, you can create a set of frames using different types of bark — one dark, one light, and one mixed — to give variety while maintaining unity.
These frames also make thoughtful gifts. A handmade photo frame crafted from natural materials carries emotional value and shows care for both the recipient and the planet. Pair it with a meaningful photograph or handwritten note to make it even more personal.
If you prefer functionality beyond decoration, try adapting the same technique to make a mirror frame, a corkboard border, or a wall-mounted key holder. Once you master the process, you can apply it to other creative home projects.
Tips for Working Safely and Sustainably
When working with natural materials like bark, always prioritize sustainability. Collect bark responsibly and avoid disturbing wildlife habitats. Use recycled bases such as cardboard, old frames, or leftover wood scraps to minimize environmental impact.
For your workspace, cover the surface with a newspaper or an old sheet to catch glue drips and bark fragments. Keep your tools organized — scissors, glue, and paintbrushes within easy reach — and work in a well-ventilated area, especially when using varnish or adhesives.
Safety is also important. Wear gloves when handling rough or splintered bark, and wash your hands after gluing. Natural crafting is meant to be relaxing and mindful, so take your time and enjoy the process.
Embracing Nature Through Craft
Building a rustic photo frame using tree bark is more than a simple DIY project — it’s an invitation to slow down, appreciate natural beauty, and reconnect with sustainable living. Each piece of bark carries its own texture and story, making every frame truly unique.
By choosing natural materials and creating something by hand, you embrace both creativity and environmental care. Whether it adorns your living room, becomes a heartfelt gift, or inspires your next craft, your bark frame will remind you of nature’s artistry and your role in preserving it.

Lucas Hartman is a DIY enthusiast and sustainability advocate focused on natural crafts and eco-friendly home décor. With a background in arts and design, Lucas creates tutorials that help families and hobbyists transform everyday recycled or organic materials into beautiful, functional projects.